In my original post on Dressing Up the TPT Quote Area, I talked about how to add just one image to the area. In Part 2, I'm going to give you some directions for adding several images to your quote area that will rotate.
First, create your images that you would like to add to your quote area. The size should be about 450 pixels by 150 pixels (1.5 inches by 0.5 inches at 300 ppi). **If you are using Powerpoint, see directions below.** The matching background gray color is #f1f1f1.
I chose to start with 3 images but will probably add a couple more. Here are my images:
Upload the images to an online GIF maker. I used GIFMaker.me.
☞ In GIFMaker.me, click the UPLOAD IMAGES button and choose your images.
☞ On the control panel, be sure your size is set to 100%. Mine is 100% and 450 px by 150 px as that is the size I used.
☞ Also on the control panel, you will set the speed. Mine is set at 5000 milliseconds (5 seconds). You don't want it too slow or too fast.
☞ Click on Create GIF Animation.
☞ Under the black buttons, click Download GIF.
☞ Upload the GIF to a site that supports GIF or upload to a Pinterest secret board.
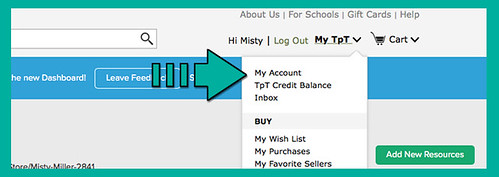
Go to My Account
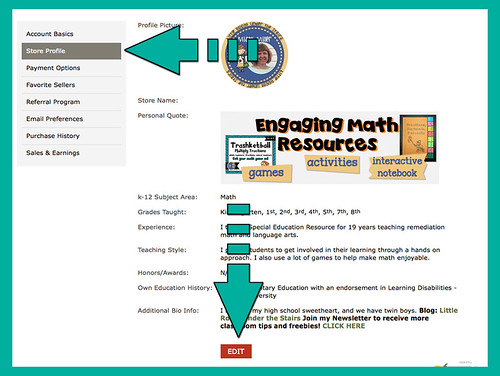
Click on Store Profile and then Edit
Change or add in the Personal Quote box
☞ Get the link from your photo site or Pinterest pin. You are only allowed 120 characters in the Personal Quote box, so you need to put your link into a link shortener such as bit.ly. {YOUR IMAGE LINK}
☞ You can link this image to new products in your store, a custom category, or a specific product. The rotating banner only allows for one link. Also, use a link shortener for this links URL. {YOUR LINK}☞ In your Personal Quote box, you will put this HTML code replacing with your links from above.
<a href=YOUR LINK><img src=YOUR IMAGE LINK></a>
If you have trouble with this, try adding a space and / after your image link.
If you have trouble with this, try adding a space and / after your image link.
***If you are using something like Powerpoint, your dpi is not going to automatically be 300 dpi. When you are creating in Powerpoint, set your page size to 6 inches by 2 inches. When you are saving in Powerpoint, click on Options and change the width to 450 and the height to 150.***
If you have any questions, please feel free to ask!








Thank you so much for posting these directions. I love the screen shots as I am a visual learner!
ReplyDeleteThanks for stopping by! I'm also a visual learner, so I try to include images. :)
DeleteThank you so much! I tried following a few other tutorials with no luck and got it to work on the first try with yours. :)
ReplyDelete-Samantha
Thanks for stopping by! I'm glad you found the tutorial useful. :)
DeleteAMAZING tutorial! Thank you so much for sharing!!!
ReplyDeleteThank you! Your tips for Powerpoint users were very helpful!
ReplyDeleteHi Misty
ReplyDeleteThis is a great Tutorial, but how do I find the direct link from Photoshop?
Thanks
Chloe
From Photoshop, you need to save it as a jpg or png. Then upload it to Photobucket or some similar site. You will not get a link from Photoshop.
DeleteThanks Misty. have a great day. Chloe
DeleteHi,
ReplyDeleteI have tried my best but failed to create. What should I do?
Thanks!
I am not sure what part you failed on. You would need to be more specific. There are some sellers who create quote area banners for sellers if you can't figure it out.
DeleteOkay, I have done everything correctly I think. Mine isn't rotating. Is it because I need two of them? Duh.
ReplyDeleteNever mind....thanks for my wonderful husband we figured it out.
ReplyDelete